|
|

Before we begin I thought I would give you some tips on what pencils and paper to use!
PENCILS AND PAPER!
Pencils: There are as many as 17 variations in hardness of graphite pencils available today:
H through 9H for hard pencils
B through 6B for soft pencils
F and HB, intermediate designations for pencils
not as hard as H and not as soft as B
You need at least five pencils (4H, 2H, HB, 2B, and 4B) and a good pearl eraser, or as I use a kneaded eraser, because it picks up mistakes without leaving a mess of eraser particles left on your paper. Also of course a sheet of paper.
1. Take each pencil and experiment. Simply make marks. Try different pressures to see how light and dark each pencil's mark can be. Do this until you feel familiar with the light and dark potential of your pencils. Then use the pink pearl eraser or kneaded eraser. Some marks erase more completely than others. What makes the difference? Are the surface fibers of the paper disturbed when you erase? What happens when you make fresh marks in an erased area? The eraser is a drawing tool as much as any other, so you need limits.
*Note* I like working with leads in mechanical holders because it eliminates pencil sharpening and the point is about the same. I use it mostly for fine details, such as the eyes!
Try other papers. How do the results differ? For paper I use a little ruggedness for pencil. There are many types on the market. So check and experiment with different types of tooth or grain and choose the one that you perfer to work with.
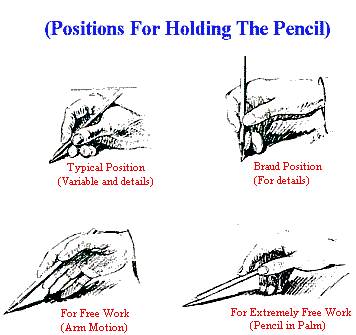
2. With each pencil, hold it first as if you were going to write and then in the ways shown in the picture below. Make marks holding the pencil in the different ways in the picture. In the "Typical and Braud positions", you are very controlled for details and lines. In the "For free work and For extremely Free work positions" you can make sweeping marks that need the full length of the paper. Your can swing your arm from your elbow and shoulder. They are not as controlled marks as in the "typical or Braud" positions.
Well these are some tips for what pencils or papers to use and some tips on how to use the pencil. Hope it helps!
ANATOMY!
I am not going into a long explanation of the muscles and bone structure of the face. It is important to understand it though. There are a wide varity of books for artists to learn from. Here are some reference books that I found very useful in my studies for drawing portraits or the human body:
GORDON, LOUISE. How to draw the Human Figure: An Anatomical Approach. London: Penguin Press, 1980.
GORDON, LOUISE. How to Draw the Human Head. New York: The Viking Press, 1977
RUBINS, DAVID K. The Human Figure: An Anatomy for Artists. London: Penguin Books, 1975.
And now on to Drawing Isaac Hanson!
Clicking on the link below will bring you to an expanded page for better viewing of the steps.
|
FIRST STEP: THE LINE DRAWING
BACK TO FIRST PAGE
MAIN PAGE
*Please Note: I have no connections with Hanson, or Hanson's Label. All art on this page is for enjoyment purposes only! No Art can be sold in Hanson's name! The art is mine! You may not copy it without my permission!! Please ask first!! Okay? Thanks!!
|
|
|